How to extract silver or gold as a color code?
gradient - Illustrator: How to create realistic reflective gold surface? - Graphic Design Stack Exchange
[deleted by user]
Gold effect
Videos
Hi, i am new to designing and for a project i am supposed to extract colors from an image (the hex code as well as the CMYK, RGB values) But my image has silver and golden elements in it and when i use the color dropper it just comes down to a shade of yellow or grey which isn't accurate at all.
I am aware that there will be use of gradient but i don't know how i can do it? Any help or even link to resources would be appreciated
I am naming these chapters starting with V as the second part of this post.
The first part has renders of 3D models, the second half of the post has vector based images.
Chapter V. Illustration
One thing that I was considering on my other answer on this same question is the premise that Illustration has an artistic interpretation that can or can not correspond to reality. That is a strong point of using an illustration over a real photo, or in this times using a realistic 3D rendering. So we need to keep in mind that.
Chapter VI. Gold Material
As you want a Gold ingot, we are assuming pure Gold, not a gold alloy, which can have different tints. Let's explore more in-depth the properties of gold from an artistic point of view.
Pure polished metallic surfaces reflect the surrounding environment. Gold absorbs a bit of wavelength producing the "yellow" cast.
Searching on some 3D rendering forums about this base tint, I found RGB values of R1G0.685B0.150 Translated into a 255 level RGB this is R255G175B38.
This means that a whiteboard reflected on the gold bar will not render white, but this tinted yellow. The final render has other values, because of the intensity of the illumination, the reflectiveness of the floor, angles, etc.
The next few images are not vector drawings. They are a 3D rendering. They are here to explore the different aspects of the material and then we will translate that into vector shapes.

Chapter VII. Reflections
Remember that the tone we see depends on what is reflected on the surface, so, let's add some white panels to reflect them.

Normally an ingot is not polished. It is not jewelry. A real ingot has a sanded finished because this comes from the cast. I am using a generic "roughness" so it is easier to see (and to produce)
See how these sharp edges on the reflection start to blend. You can start constructing gradients on illustrator.

Now, look how the "direction" of the gradients represent what is, again, reflected.

To simplify the gradients more, I am simulating a more sandblasted finish. I'll go back to a more polished look later.

Chapter VIII. Bevel
We had a main light above the ingot all the time, but because of the stiff angles, the reflection was not in the correct place to be spotted. Now it is because the round border has many angles.

Chapter IX. More ingots
Now ingots start to interact. Between them, we now have a black face, because we are not reflecting the external ambiance.
But more importantly, notice how the faces orientated similar, act as segments of a single wall, having somehow consistent gradients with small changes between them.
Also, the ingot closer to the camera now reflects the one above it. This can start to get more and more complicated to simulate an illustration. But keep it in mind.

Chapter X. Surroundings
If I add a real-world ambient, it starts to get complex shapes on the reflection, and also, it starts to take the dominant color of the surroundings. The base material has not changed in hue or tone, I only moved the roughness to have more distinct shapes reflected.

This looks more orange because the illumination itself is warmer.

Remember, for illustrative purposes having a more reproducible gradient implies a less polished gold.

Chapter XI. Reflection on reflection
When I put two ingots that receives light between them the light starts bouncing, and the already yellow cast turns a bit more orange.

Chapter XII. Now the gradients on the vector program using mesh
- Take some sample colors so you have a basic palette. You can use any color reference you have.

- Define your basic shapes, one each face. And I am preparing the mesh fill. I am trying to keep it simple.

- Play with the colors of the palette you defined earlier, of course, you can sample more colors from the reference image.

- Put these mesh objects inside your basic shape (Clipping Mask)

This starts to look decent.

- I'll add some shadow to see what is happening. Just some flat shapes combined.

- Preparing now the bevels.

7. I strongly recommend that you make a flat bevel. This will simplify the process. A flat bevel is made exactly the same as the flat faces. Stop reading now...

- Ok, want to continue the hard way...? These gradients are tricky. The exterior nodes are transparent to blend. The interior ones should be using colors that make a good contrast.

Play with the mesh. This needs some experimentation.

More tweaking of the shadow...

The final geometry is simple.

Some nested objects. It was all about gradients.


The result
Here it is. It can be improved, but like everything it takes time.

Look at images of real gold! I mean sure you can try to solve this issue with plain thinking. But truth is, gold has a very special reflective behavior.

The trick to gold is that its reflection is actually red in color, especially apparent in inter gold reflections (see above and this stock image). But be careful, not very many people can afford to have a photo shoot with real gold so many images you see aren't actually gold.
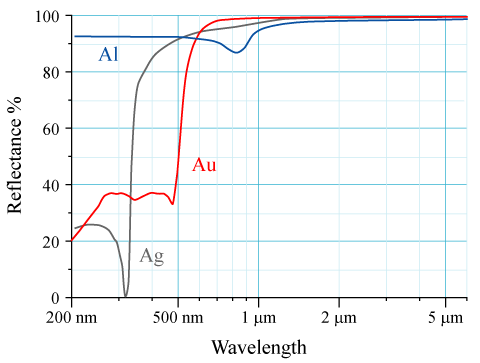
Image 1: Reflectance of gold