There's no easy, 1-2 step process, or simple menu command to do this. Each glyph will be different and requires manual construction....
The best, easiest, way to do this in Illustrator is via Gradient Meshes in my opinion.

Basically...
- Set type and create outlines (or copy the shapes you wish to use - it's always wise to keep a NON-mesh copy of shapes on hand.)
- If the glyphs have counters, you will need to remove those (you will have to add them back later, separately)
- With one glyph selected, click once along the edge of the glyph with the Mesh tool. This converts the shape to a Mesh Object, in addition to adding mesh points (which you will see).
- You will need another mesh point offset from the edge of the shape in order to indicate where the transparency should start. If you look at the image above, the colors are put on the edge of the shape, then there's another mesh point offset from the edge. That inner mesh point is to control the maximum area the color can populate. When adding mesh points, it is best to always add them to any existing mesh paths. So you'll want to add this inner, offset, point along the mesh line created when you added the first mesh point.
- Using the Direct Selection Tool (White Arrow) click the edge mesh point and then choose a color. You'll ultimately want all the colored mesh points to be on the edge of the shape.
- Still using the Direct Selection Tool (White Arrow), hold Option/Alt and click the mesh object (The glyph) so all points are highlighted/selected
- Hold Shift and click that one mesh point you added with a color to DEselect it.
- Using the Transparency Panel set the
Opacityto0%- this should cause all points, except your color point become invisible.
From there, it's a matter of repeating... Add a mesh point, set its color, set all non-color points to 0% opacity.
This reads as far more complicated than it actually is, if you understand Gradient Meshes. If you are unfamiliar with meshes, it may take some learning to get accustomed to how they work.
For glyph counters, you have to think of the mesh construction in reverse, you want the shape of the counter to be slightly larger than the original counter. Then add colored mesh point inside the edge, so they blend to transparency outward to the edge rather than inward. The counter mesh and the main glyph mesh need to be two separate objects. You can't use the standard compound paths with meshes.
For assistance using the Mesh tool and constructing meshes, please see the help files: https://helpx.adobe.com/illustrator/using/meshes.html
I did assume the desire is a transparent "glow" effect. If a transparent background is not necessary, then you can ignore all the transparency/opacity directions and just use black mesh points rather than transparent ones.
You can also add all the desired color points. Then select all points, de-select the color points and set opacity to 0% at that time. This can avoid having to repeatedly reset opacities when new mesh points are added.
Answer from Scott on Stack ExchangeHow do I apply a single gradient across text?
Select all the letters, Object > Compound Path > Make. Any objects that are made into a compound path will act as one single object as opposed to separate objects.
More on reddit.comadobe illustrator - How to apply a continuous gradient to a shape with text - Graphic Design Stack Exchange
How to Apply Gradient to Editable text in Adobe Illustrator 2021 [FASTEST WAY]
Can't add gradient to text?
Videos
There's no easy, 1-2 step process, or simple menu command to do this. Each glyph will be different and requires manual construction....
The best, easiest, way to do this in Illustrator is via Gradient Meshes in my opinion.
Basically...
- Set type and create outlines (or copy the shapes you wish to use - it's always wise to keep a NON-mesh copy of shapes on hand.)
- If the glyphs have counters, you will need to remove those (you will have to add them back later, separately)
- With one glyph selected, click once along the edge of the glyph with the Mesh tool. This converts the shape to a Mesh Object, in addition to adding mesh points (which you will see).
- You will need another mesh point offset from the edge of the shape in order to indicate where the transparency should start. If you look at the image above, the colors are put on the edge of the shape, then there's another mesh point offset from the edge. That inner mesh point is to control the maximum area the color can populate. When adding mesh points, it is best to always add them to any existing mesh paths. So you'll want to add this inner, offset, point along the mesh line created when you added the first mesh point.
- Using the Direct Selection Tool (White Arrow) click the edge mesh point and then choose a color. You'll ultimately want all the colored mesh points to be on the edge of the shape.
- Still using the Direct Selection Tool (White Arrow), hold Option/Alt and click the mesh object (The glyph) so all points are highlighted/selected
- Hold Shift and click that one mesh point you added with a color to DEselect it.
- Using the Transparency Panel set the
Opacityto0%- this should cause all points, except your color point become invisible.
From there, it's a matter of repeating... Add a mesh point, set its color, set all non-color points to 0% opacity.
This reads as far more complicated than it actually is, if you understand Gradient Meshes. If you are unfamiliar with meshes, it may take some learning to get accustomed to how they work.
For glyph counters, you have to think of the mesh construction in reverse, you want the shape of the counter to be slightly larger than the original counter. Then add colored mesh point inside the edge, so they blend to transparency outward to the edge rather than inward. The counter mesh and the main glyph mesh need to be two separate objects. You can't use the standard compound paths with meshes.
For assistance using the Mesh tool and constructing meshes, please see the help files: https://helpx.adobe.com/illustrator/using/meshes.html
I did assume the desire is a transparent "glow" effect. If a transparent background is not necessary, then you can ignore all the transparency/opacity directions and just use black mesh points rather than transparent ones.
You can also add all the desired color points. Then select all points, de-select the color points and set opacity to 0% at that time. This can avoid having to repeatedly reset opacities when new mesh points are added.
Gradient effect on text? It's tricky as it has been already shown by others. It's much easier to add a text effect to a gradient. - I mean to make some gradient or gradient mesh or blurry color blobs and clip the needed shapes with opacity masks so that the result is like text. The black zone in the middle of the letters can be a blurry smaller letter:

outlined text and a blurrad smaller copy of it. The size is reduced at first by using the offset path effect.
A gradient mesh and the same clipped by using the text as inverted clipping opacity mask
The blurry reduced size text is moved on the top and a black rectangle is inserted to back.
The blurry top shape which covers a part of the gradient letter can be more complex than only an offset path. You can edit it as you like and have there more than one shape.
Be sure that your raster effect rendering resolution (in PPI) is high enough, because Illustrator blur finally is a raster effect which will be rasterized when you try to use blurred shapes outside Illustrator. Low raster effect rendering resolution may run fast but it can look rough even on the screen. For printing the setting should be as high as for printing photos.
You may want to try some variations. It's easy in this case. Blur effect can be adjusted and Opacity Mask can be released at will. Open Transparency and Appearance panels to get them back into your hands.
If it disturbs you that the gradient mesh is still there as a whole, only made partially transparent, you can use the method already explained by user Scott. Or try something else -like gradient strokes.
Beware: Blurs and gradients need some precautions if you are going to print them. Adobe fortunately has published long help guides of the subject. Check them to avoid problems like banding and losing appearances which are based on transparency.
I wanted to know how I can apply a gradient across all characters of a word as if it were a single object. I have converted my text to outline, but whenever I apply the gradient I want it applies to each one individually, like this. I have tried to do something like this where I use the pathfinder tool to cut out letters from rectangle with a gradient, but it only cuts out the "T" for some reason. Can someone point me in the right direction or tell me what I'm doing wrong? Thanks.
Select all the letters, Object > Compound Path > Make. Any objects that are made into a compound path will act as one single object as opposed to separate objects.
Object>expand. Group them?
Correct me if I'm wrong anybody.
Edit: might have to mask the gradient over the top of them.
Group the type with the artwork (bullseye).
Then add a new fill via the Appearance Panel so it is above the <Contents> item....
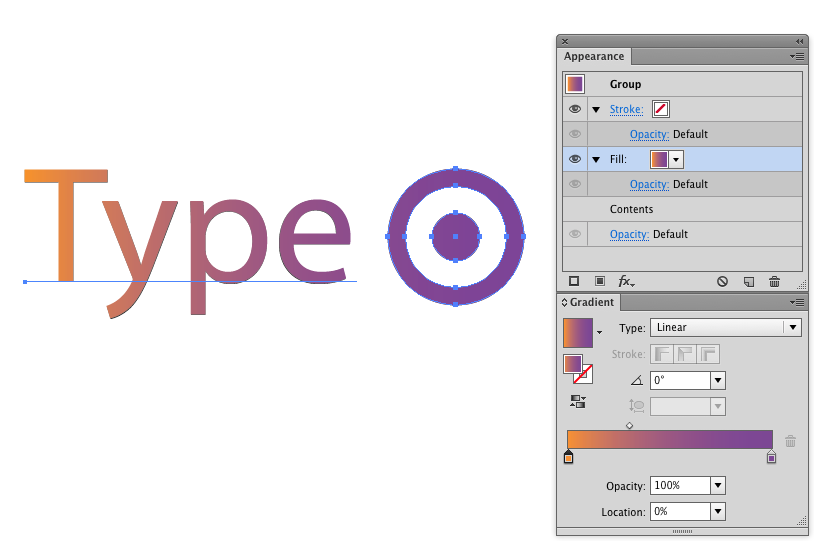
Then use the Gradient Tool and Gradient Panel to adjust as desired.
You will need to group the object, but the gradient tool for some reason does not allow you to apply a gradient to a grouped object directly (as you can see me demonstrate in the middle of the attached GIF). I'm not sure if this is a bug or not - but there is a workaround!
Group the text and the object, then add a new fill from the appearance panel. From here, you need to open the gradient panel and double-click the ramp. From there, you can use the gradient toolbar item to manipulate the fill, or you can continue modifying it from the gradient panel.
