Solved. It's a comeback of the "multiple screens" issues. I moved PS to another screen, repeated the action and suddenly the gradient editor came up again. So basically what happened was that Adobe for some reason thought it's a good idea to spawn the editor window behind the main window, so you can't see it :)
Moving the window around displays solved the issue. The eyedropper comes up because that's what you can do while the gradient editor is opened, likely has been like that before. Just the UI bug is something I haven't had since CC.
Original:
Been using PS 2020 up to this week because I hate running into app changes that may disrupt mission-critical work.
Had to update to 2023 and now and for some reason I cannot edit gradients anymore. So basically my fear went fulfilled again
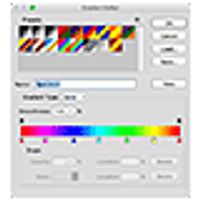
With PS 2020, I used to be able to do the following:
- Enable the gradient tool
- click the gradient in the top bar
- a new window would open up, letting me adjust the gradient's colors, marker positions etc.
Now what happens with PS 2023 is that when I click the gradient, it opens the eyedropper tool
Tried control-clicking, shift-clicking etc. nothing makes the gradient editor come up. It always gives me this eyedropper tool that I really do not need at all in that case. I don't even know what I'm supposed to do with the eyedropper tool in that instance, clicking anything, selected or unselected, doesn't do anything and doesn't affect the gradient anyway.
Am I doing something wrong? Did that change? Is there some setting to make it go back to the previous behavior or how am I supposed to directly edit gradients now?
How can I edit the colors in an already-placed, custom gradient in Photoshop? - Graphic Design Stack Exchange
adobe photoshop - Editing Gradient Mask Once Applied - Graphic Design Stack Exchange
adobe photoshop - How can I replace the color of a gradient in an image? - Graphic Design Stack Exchange
Photoshop 2023: Cannot directly edit gradients anymore?
Videos
In Photoshop, the only way to retrieve gradient color data is to...
A) use a Shape/Vector layer which has a gradient fill.
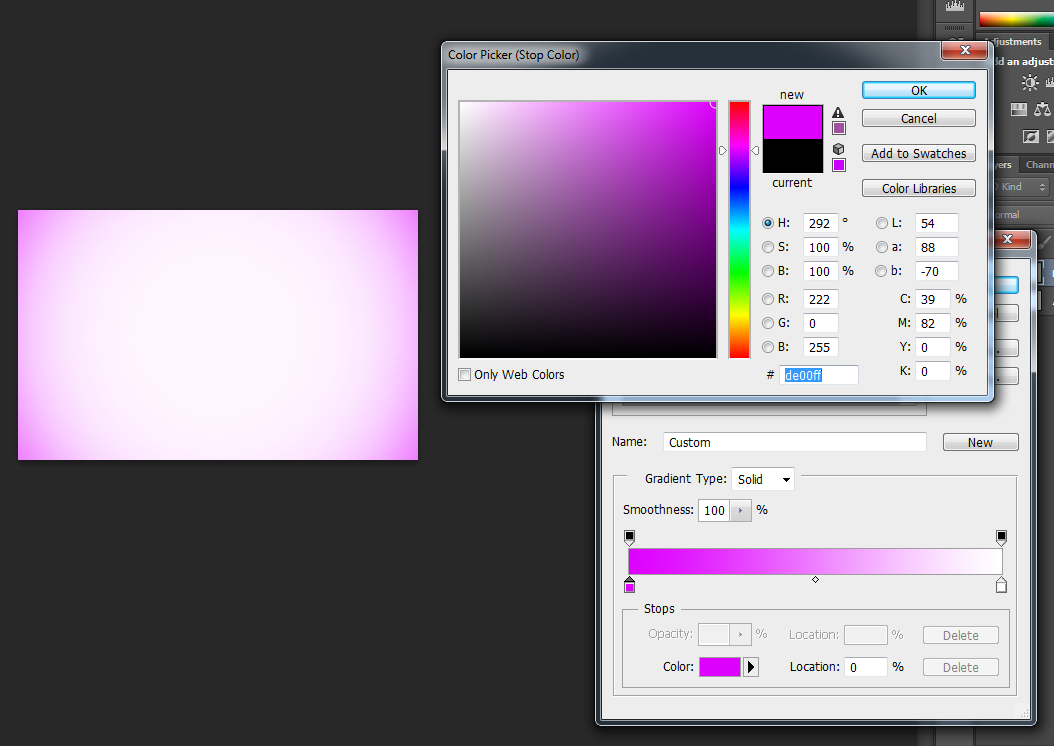
B) Save a gradient in the Gradient Editor dialog window.
C) Apply the gradient as a Gradient Overlay Layer Style.
D) Use a gradient fill layer via Layer > New Fill Layer > Gradient
If you did none of these, then the specific gradient data is not stored anywhere directly. You can use the eyedropper tool to sample colors at the end of the gradient and rebuild it, but you can't directly access the gradient data.
I think the best way to make editable gradients that can be edited or changed easily whenever and however u please, is to use > add layer style > Gradient overlay .
Then at any time, from the layer of the gradient: you can click on the effects icon (eye icon) > gradient ovelay icon and edit it as you may wish .(of course in the PSD file) .


Since your source image seems to be composed of only two colors, one lighter than the other, you can use a Gradient Map. This will allow you to assign new swatches to the source image. If you want the original color in the middle, add it to the replacement gradient.
Use the Hue/Saturation tool by selecting image>adjustments>Hue/Saturation and in the opened dialogue box move the hue slider in a new position to replace the color.
what hue slider do is to rotate the color all around the color wheel, and you will notice that some color in the gradient background will change accordingly.